How to install plastic windows yourself in a brick house. Do-it-yourself installation of plastic windows - step-by-step installation technology in photographs
Installing windows is an important step that allows you to give your apartment or house a new look, retain heat inside, and increase the sound insulation of the room. This work is of medium severity; it takes approximately 3-4 hours to install one double-glazed window. If a person has minimal construction experience and has tools, he can carry out the entire installation himself, taking only one assistant. This approach to business will help save a significant amount, and will also allow you to personally ensure that all work is carried out strictly in accordance with GOST.
How to get the necessary measurements to order a window?

To install Euro windows in your home, replacing old ones that do not perform well with their assigned functions, you should take preliminary measurements in order to order new designs.
- hacksaw;
- hammer;
- nail puller;
- mount;
- axe.
There are two ways to remove the frame:
- Slowly and carefully loosen, trim and remove the frame.
- Cut the structure into several parts and remove.
Be sure to remove the remnants of old polyurethane foam, cement, insulation, in a word, all those materials that were used to attach the old window unit. During work, it is good to use a vacuum cleaner; it will best collect construction dust, preventing it from spreading throughout the room. A compressor helps a lot, with the help of which you can easily blow dust out of all the cracks, then go through a special sink, if available.
Important! Polyurethane foam is best attached to a damp surface, which reduces heat loss after all work is completed. With this fastening, it is tightly connected to the structure of the material, and there is no interaction with dust.
When choosing a dismantling method, it is better to prefer careful knocking out. It is very important to leave the supporting structure intact; the smoother the opening, the easier it will be to install and secure the new block.
Preparation for installation of plastic windows

When plastic windows have already been ordered, you need to clarify the timing of their production and delivery to the installation site. There is no point in starting any work until the structure is delivered. Only after the window system is brought into the apartment, you need to move on to the preparatory stage.
It includes the following mandatory actions:
- clearing the space in front of the window;
- putting aside all the furniture present in the room;
- covering heating radiators and floors with film or fabric.
Preparing the window profile
Installation work on installing polyvinyl chloride structures begins with preparing the window. If there is such a need, the double-glazed windows are dismantled and the hinged sashes are removed from the surface of the frame.
To carry out this work, you should:
- using a chisel, pry up and remove glazing beads from the grooves: start working with elements located vertically, then remove the bottom one, and the top one last;
- mark the glazing beads so that at the stage of their reinstallation, you do not confuse which one was removed from (this will cause gaps of half to one millimeter);
- tilt the frame to release the glass unit from the grooves: here it is better to work with a partner. Carefully place the package against the wall, leaving a corner so that it does not fall;
- remove decorative caps from canopies;
- unscrew the clamping bolts;
- if the system is transom, release the upper part of the sashes by turning the handle to the center (the sashes must be open in ventilation mode);
- remove the hook from the lower canopy.
Now all that remains is a frame with imposts, these are vertical and horizontal jumpers, they are required to separate and strengthen the sashes.
On the inside of the frame, around the perimeter, make holes necessary for attaching anchors. There should be three of them on each side, top, bottom. To drill holes comfortably, you will need a special metal drill, because there is always a metal insert inside the plastic profile, which increases its strength. To fix the structure, anchors are used, the length of which varies from 8 to 10 mm. You only need to select the appropriate drill diameter.
If fastening is carried out using fastening lugs, preliminary disassembly of the block is not required. The included clamps are attached to the frame with screws.
Filling the stand profile with foam

To install a window, you need to fill the stand profile with foam. Although this option is not always implemented by installers, it is important.
Important! This stage is important to eliminate the thermal bridge that will form at the bottom of the opening.
In order to prevent violation of the thermal insulation performance of the room, this part must be foamed with a composition containing polyurethane. It is best to carry out the procedure one day before the start of the main work, so that the composition is completely hardened and fills all the necessary space.
Removing the old window. Preparing the opening

On the day you plan to install a new double-glazed window, you need to start removing the old window system. If preserving the frame is not required, remove the sashes from the canopies, or remove them along with the screws that held them in place.
File the frame and frame in different places, then use a nail puller to pry up the bottom plane and remove it outside the opening. Under the box there will be a sealant, insulation, they are removed. Then, using a spatula mounted on a hammer drill, part of the slopes is removed, or they are dismantled completely. Here everything depends on the owner’s further plans for the formation of these elements.
Now it’s time to remove the window sill; use a punch to remove the cement backing that is located at the bottom of the opening, under the window sill.
Construction waste should be removed into bags prepared in advance, immediately removing it and the remains of the old window from the room. This is necessary to prepare free space for subsequent work. It is necessary to free the ends from dust and dirt; it is important to compare their position relative to each other. The surface must be primed.
When windows are replaced in wooden houses, an additional waterproofing layer is laid. It should run along the entire perimeter of the opening, this is important to prevent moisture from penetrating into the foam from wooden structures located outside. Here you may need to strengthen the entire structure by installing a box made of solid wood.
If the building in which installation work is being carried out is located in the city center, you should first clarify the possibility of changing its appearance. There is a possibility that changing the size of window openings on this facade may be prohibited. Here, there may be a need for restoration work to restore the size of the opening by replacing the cement screed on the sides, as well as at the bottom.
Correct installation of plastic windows with your own hands
There are two main methods by which double-glazed windows are installed:
- With window disassembly.
- Without disassembling the window.
The first method requires drilling holes through the frame into which anchors will then be driven. This method is complex, however, this type of fixation is highly reliable.
When installation takes place without first unpacking the block, metal plates are attached to the frame, after which they are fixed to the walls. This method is much faster, but the fastening is not reliable. There is a possibility that when serious wind loads appear, the frame may sag or become warped. To mitigate this drawback, experts recommend using thick, wide plates used for fastening rafter systems.
Important! In regions where strong winds often blow, it is recommended to use only a method that includes preliminary unpacking of the structure.
Technology and procedure for installing plastic windows with your own hands
The stages of installation of plastic window structures have the following sequence:
- Dismantling work to clean old blocks (when they are being replaced).
- Preparing a new window.
- Installation of the supplied profile, its alignment.
- Fixing fasteners to the frame.
- Making holes in the wall at the site of future fastenings.
- Inserting a structure.
- Aligning the block by level, horizontal and vertical.
- Fixing the structure with fasteners.
- Filling the gaps between the window and the opening with construction foam.
- Installing the window sill and leveling it.
- Creation of slopes.
- Adjustment of fittings.
- Installation of ebb tides on the façade.
Important! When the structure is installed in an apartment, the tides are made after installing the frame from which the glass unit has previously been removed. In a private house, installation of ebb tides is done last, because it is possible to get to it from the street.
Do-it-yourself installation of a plastic window

Before installing the block itself, the stand profile is fixed:
- lay the profile where required;
- align the product horizontally;
- check whether the window will fit into the opening;
- if there is a large amount of free space at the top, blocks are placed under the profile;
- reliably foam with the mounting compound using the extension nozzle on the gun, which will ensure deep penetration of the foam.
The installation itself includes the following steps:
- Attach the fastening parts to the frame (anchor plates), placing them perpendicular to the plane of the window. They are fixed at a distance of 10 to 20 cm from each corner of the frame.
- Each self-tapping screw is screwed into a dowel on the end of the anchor plate. This is done from the outside of the frame. The second self-tapping screw goes into the other end of the plate into the wall, also through a dowel.
- When a window is inserted without glass packages, the fasteners are placed inside the frame using dowels. It is important to not wind them all the way to avoid damage to the frame.
- To insert the dowel, drill a hole.
- After fixing the block, its horizontal and vertical levels are checked.
- The window should be leveled with an assistant who will place the bars.
- Foaming must be carried out completely: when the space occupies more than 2 cm, the procedure is carried out in two stages, with a two-hour break for the composition to dry. Before applying the foam, the surface is moistened with water using a spray bottle, this increases the degree of fixation. When fixing the structure at sub-zero air temperatures, winter or all-season foam should be used.
- The composition dries for half a day, then the outer side is covered with tile adhesive, mortar, impervious tiles, in order to protect it from exposure to ultraviolet rays.
DIY window sill installation for plastic windows
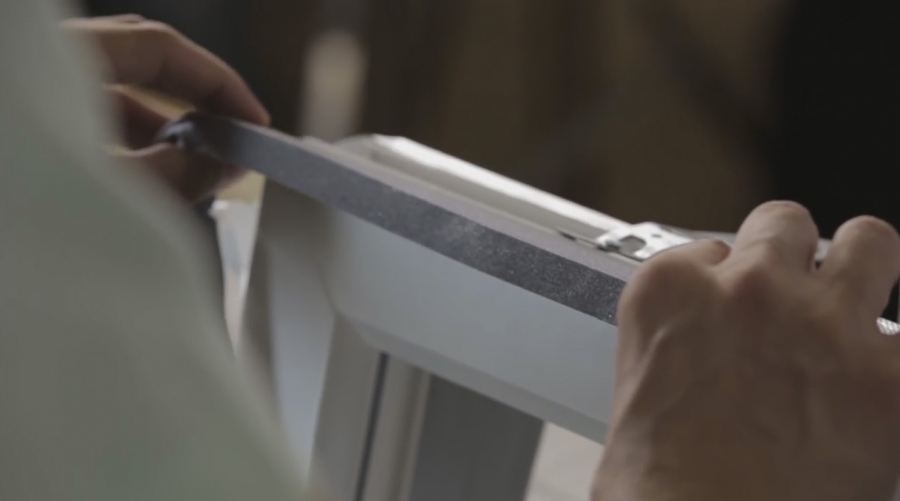
To mount the window sill, you must first remove the excess length. As a rule, manufacturers deliver this object significantly exceeding the parameters. For this, a jigsaw or grinder is used.
The work process goes like this:
- remove excess part of the element;
- move the window sill to the profile, align it;
- when there is a significant gap, it is sealed with mortar (the window sill is removed);
- check the device for subsidence by pressing it firmly on top with your hands;
- if the structure is positioned correctly, it is foamed, after putting on the plugs (gluing them with super glue);
- heavy things are placed on the top of the object to ensure its complete adherence to the surface;
- excess dried foam is removed the next day.
Do-it-yourself installation of slopes on plastic windows
Installing windows necessarily involves installing slopes, it goes like this:
- use a knife to remove any excess foam that remains around the perimeter of the wound;
- cut the required length of PVC panels (two for heights, a third for width);
- make vertical fastening;
- fix with polyurethane foam;
- Before the composition hardens, attach the panels to the wall with masking tape, otherwise the foam will push them out;
- insert an F-shaped profile between the wall and the strip for the final framing.
Do-it-yourself installation of ebb tides on plastic windows
Shimmers are an important component of the window system; they differ in one feature: if the installation was not carried out correctly, it can be detected too late. And it will take a long time to fill such gaps. To avoid having to eliminate such problems later, you should immediately take the maximum possible measures to seal the joints, paying attention to how the frame adjoins the side slopes.
Useful tips for installing ebb tides:
- level the position horizontally as much as possible: installation at an angle, or the lack of a flat surface will lead to the accumulation of water drips, which will cause unattractive marks to appear on the wall. When everything is saddled correctly, raindrops flow evenly, which reduces the degree of wetting, speeding up the drying process of the walls;
- At low tide, make a base of both cement and sand, strong and level. Using foam will reduce the cost and speed up the process, but will negatively affect its quality. Periodically washing the outer part of the windows, standing with your feet on the low tide, will lead to a violation of its geometry and strength. Therefore, the structure will have to be reinstalled;
- The side edges of the element should be placed strictly under the finishing: when the slopes are made of plaster, you can cut into them to a depth of up to a centimeter (this is a necessary condition; it is unlikely to be possible to avoid leaks by just using sealant).
Low tides perform a number of important functions. Properly installed structures ensure that water does not penetrate the wall surface. They drain water and, when securely fastened, are absolutely silent, even in strong winds and rain.

Flashings can be created from different materials; the simplest and cheapest is galvanized. Plastic structures are also sold, which do not offer any great advantages, and, moreover, quickly lose their attractiveness under the influence of precipitation.
The aluminum elements are of high quality, they are about a millimeter thick and also bend. They are powder coated to ensure durability.
Polyester products are created from painted galvanized steel strips; they are bent at the final stage of production. These elements received this name due to the use of paint based on polyester. The coating is of good quality; even after long-term use it does not lose its appearance or crack. These visors are several times cheaper than aluminum ones.

Separately, it is worth noting plastisol visors; they are resistant to changes in air temperature and the effects of precipitation. In addition, their appearance is neat and aesthetic.
The process of installing ebb tides goes like this:
- prepare the entry of the element under the window system;
- PVC structures have a special profile located at the bottom, to which the visors are attached;
- fixation is carried out by attaching screws and rivets;
- the free space that remains under this element must be filled with mounting foam to provide thermal insulation, absorption of sounds from rain, and reliable fastening;
- so that the foam does not raise the ebb before it dries, it is fixed by pressing tightly.
It is very important to correctly design the approach to external slopes. To do this, make side bends so that the canopy extends over the surface of the slopes. This approach will ensure that water immediately flows from the window and slopes to low tide. Therefore, it should be installed before installing the slopes located outside, on the facade of the building.
Today, owners of houses and apartments are massively replacing old wooden windows with practical and durable PVC structures. And this choice is quite justified for a number of reasons:
- Due to increased thermal insulation, material costs for heating are significantly reduced.
- High functionality and modern materials make it possible to avoid additional window maintenance work: tinting the frames to give them an aesthetic appearance; caulking cracks to insulate windows for the winter; removing the insulation from the window in the spring; pulling gauze over the sashes to protect against mosquitoes and other midges and other work that is implied in the operation of wooden window structures.
- A sealed double-glazed window well insulates the room from noise, allowing you to maintain home comfort and protect the peace of the owners.
- The structures have a long service life while maintaining impeccable functionality and aesthetic appearance.
- The cost of a plastic window is lower than a similar wooden product. For example, the price of an unpainted double wooden frame without glass measuring 120x90 cm is 3,600 rubles, and a plastic window is 5,500 rubles. However, a wooden window will still need to be glassed and painted, which means additional time and materials. Whereas the plastic window is already ready for installation.
Those who are going to take on the task of installing plastic windows with their own hands often lack basic knowledge of how to do it correctly. That’s why we present this article here in the form of instructions to help owners who want to carry out the installation themselves.
Installing plastic windows has a number of nuances. For example, PVC windows are not such universal designs. And their use has a number of limitations. Thus, it is not recommended to use plastic windows in cold rooms without heating (verandas, canopies, attics, garages, bathhouses, etc.). By the way, window production and installation companies prefer not to talk about this. In addition, problems may arise when installing PVC window profiles in multi-storey buildings above the 4th floor.
When choosing a contractor to replace windows in your house, you may encounter the fact that the craftsmen simply will not delve into the intricacies of this issue. There are only a few people who have control over the situation and can comprehensively cover it.
First, let's try to figure out the question: does it even make sense to install PVC windows with your own hands? Contrary to popular belief, installing windows is not that difficult. To perform it, you do not need to stock up on professional equipment or gain special experience over a long period of time. The installation procedure itself consists of two stages:
- dismantling the old structure;
- installation of a new plastic window.
Usually dismantling takes from 0.5 to 1.5 hours. The actual installation of the window (we take an average window measuring 2x2 m) will take another couple of hours. It turns out that it will take a maximum of three and a half hours to replace one window. Therefore, during Saturday-Sunday you can freely change at least 2 windows without resorting to the help of specialists. Considering that installers charge $40-60 for installing each window, we get quite a good saving. Some companies set installation costs as a percentage of the cost of the windows. This amount varies among different specialists and is about 10-40% of the price that is proposed to be paid for the windows. Also, when ordering windows from specialized companies, they can deliver the new structure to your home and dismantle it free of charge.
When entrusting the installation of windows to specialists, you can demand the following guarantees:
- When purchasing windows from a third-party company, installers provide a guarantee only on installation seams and their filling, the correct geometry of individual elements and the functionality of the window structure for 1 year after the work has been completed. Since self-installation practically deprives you of the warranty on window structures, you need to be more careful in choosing products. It is better to prefer windows manufactured at the factory, in compliance with all technical requirements and conditions. Handicraft products are a “pig in a poke”, the quality and functionality of which can present an unpleasant surprise. In this regard, to purchase window structures, it is advisable to contact directly a manufacturing company that has been operating on the market for a long time and has good reviews from numerous clients. By the way, if you order windows in winter or spring (that is, out of season), you can get a significant discount;
- when purchasing windows from a company that carries out installation work, the customer receives a warranty on the fittings - from one to 5 years (the more expensive the windows, the longer the warranty period, as a rule);
- If the windows are installed with your own hands, then a warranty on the fittings must be requested at the place where the structures were purchased. You will have to take full responsibility for the quality of the seams.
Do-it-yourself installation of PVC windows should be done if you have:
- a couple of free days (weekends as an option);
- hard work and desire to learn something new;
- desire to save money.
If all of the above is present, then the recommendations outlined in this article will allow you to successfully replace the windows in your house, doing it no worse than a professional installation team. Actually, a whole team is not required to install the window; two people will be enough, one of whom will carry out the installation, and the other will hold the structure and provide the necessary tools. Despite the apparent complexity, self-installation of PVC windows is a fairly simple process, representing a combination of several simple operations performed in a given sequence. Before you begin installation, you need to order a window, and this requires correct preliminary measurements. So…
Window measurements: everything you need to know
First, we determine the type of window opening.
It can be of two types: either with a quarter or without a quarter.
Taking measurements of a window without a quarter
A clean window opening is the easiest to measure. Such an opening is found only in a new house. We measure the opening itself in the vertical plane and subtract 5 centimeters from the resulting figure. We have height. Of these 5 centimeters, 1.5 centimeters will be filled with mounting foam at the top of the window, and 3.5 centimeters will be laid for installing the window sill. Similarly, we measure the opening in the horizontal plane, subtract 3 centimeters for the gaps (1.5 cm on the right and left) and get the width of the window.
Next, measure the length and width of the ebb and window sill. To the resulting dimensions you need to add from 5 to 20 centimeters in order to “embed” the window sill a little into the wall on both sides. If you are getting down to business for the first time, then set the size of the window sill larger - during installation, all excess will be cut off. As a rule, window sills and ebbs have a standardized width (10-60 cm) and length (up to six meters). Having minimal dimensions, installers will be able to select and deliver the most suitable parts.
We take measurements of the window and a quarter
Width: measure the opening in the horizontal plane between the quarters and add three centimeters to the resulting figure (one and a half centimeters on each side). Height: measure the distance from the bottom edge of the opening to the edge of the top quarter. There is no need to add or subtract anything from the resulting figure.
The window sill and ebb are measured, as in the first option.
As a result, after all the measurements made, we should have written down:
- window height and width;
- length and width of the ebb;
- length and width of the window sill.

When replacing old windows, the previous structure is located in the opening, which means that the opening itself cannot be measured. Therefore, it is necessary to take measurements from the window frame, which will subsequently be dismantled.
When ordering a window, try to find out what comes with the windows. Typically the following elements are included:
- windowsill;
- end caps. To choose the right plugs, you need to indicate the width of the window sill (the protruding part from the wall);
- installation profile;
- anchor plates – structural fastening elements.
If these parts are not included in the kit, you will have to purchase them additionally.
In addition to dimensions, other data may be required:
- profile type (number of cameras);
- double-glazed window option (number of glasses and air chambers);
- type of opening window sashes. The most common: swing, tilt and turn with ventilation, combined. In addition, in some cases, blind windows are installed that cannot be opened. The type of opening is determined by the fittings installed in the structure. The ease of use, functionality and durability of the window depend on the type and quality of the fittings. There are several types of window openings. For convenient ventilation, the window should be equipped with tilt-and-turn fittings. Blind versions of the sashes are unsuitable for ventilation; conventional hinged sashes without turning are inconvenient.
Thermal conductivity and sound insulation of the window: so that noise and cold do not sneak into the house
Thermal conductivity of plastic windows
In addition to the manufacturer, when choosing a window, it is also necessary to take into account such quality as the thermal conductivity of the structure. According to SNiPs and territorial building codes, the heat transfer resistance coefficient of a window varies depending on the climatic conditions of the region of residence. Structures that are installed in residential premises should not have a heat transfer resistance lower than that specified for the specific region of residence.
Thermal conductivity directly depends on the design and type of glass used in the double-glazed window. If you order windows with energy-saving glass, the thermal insulation of structures increases by 10-15%. The cost of energy-saving glass is about 250 rubles. for 1 sq. m.
The thermal conductivity of a window may decrease due to poor-quality installation, or less often due to manufacturing defects. Very often, in the process of improper installation, a chip or crack appears on a double-glazed window, and the structure loses one of its main qualities - tightness. Visually, this manifests itself as fogging of the inner surface of the glass. As a result, in winter the room will become colder, and the house will have to be heated more.
To improve the thermal conductivity parameters of the window, you can prepare a support profile. From the point of view of thermal conductivity, the stand profile is the weakest point in the window structure. To attach the drain, you will have to drill it, which will further worsen the thermal conductivity parameters. To normalize the thermal insulation properties of the window, the internal volume of the stand profile can be filled with polyurethane foam. This should be done the day before installing the window so that the foam completely hardens. Foaming of the stand profile is not provided for by GOST; window companies also do not practice this operation.

Soundproofing properties of plastic windows
This parameter is essential if there is a busy highway or railway near the house. However, it is always more pleasant if external noise from the street does not penetrate inside the house. And this cannot be achieved without high-quality window sound insulation.
Methods for installing PVC windows: to unpack or not to unpack – that is the question!
When installing windows, you need to choose the type of installation - with unpacking (unpacking) or without unpacking. Want to understand how these two methods differ from each other? Take a look at the diagram of a plastic window.

- Frame– one of the main elements of the window. The frame is formed from a reinforced PVC profile and several sealed chambers. The number of cameras can vary from two or more.
- Double-glazed window- the largest element of the window, occupies about 80% of its area. It is a sealed structure consisting of glass. Depending on the number of glasses and air gaps between them, it can be single-chamber, double-chamber, etc. The double-glazed window fits tightly to the frame due to the seal.
- Glazing beads– parts that allow you to mechanically secure the glass unit to the frame.
- Impost– a divider, thanks to which the window is divided into several sashes. There are single-leaf, double-leaf, three-leaf, etc. designs.
- Blind sash– a sash without an opening mechanism.
- Transom- opening door.
- Window sill(other names – bottom, mounting, stand) profile– load-bearing element of the window structure. It is necessary for the correct installation and fastening of a plastic window sill and external drain indoors.
- Accessories– all moving parts of the structure intended for opening, closing, fixing the transom when ventilating the room.
Window installation method with unpacking
(in some regions the term “unpacking” is used, the essence is the same). This method is based on preliminary disassembly of the structure: glazing beads and double-glazed windows. After fixing the frame to the wall throughly, all removed elements are installed again.
To quickly and correctly unpack the structure, you need a strong knife or chisel. We insert a knife blade or chisel between the glazing bead and the frame, and with gentle blows on the handle, knock the glazing bead out of the groove until a gap appears. Then we bend the knife (chisel) and push the elements apart with the wide side. We consistently do this with all the glazing beads that hold the glass unit in the sash. It is not recommended to do this procedure with the sharp end of a knife, since it increases the risk of damaging the window or glazing bead. To remove the glass unit, be sure to wear gloves, otherwise you will injure your hands on the sharp corners of the structure. If the window is not solid and there are sashes, remove them. If there is a transom in one of the sashes, it is easier to remove the entire assembly without removing the glass unit. That's it, the structure is ready for installation.
Disadvantages of the method: more labor-intensive, takes longer than installation without unpacking (on average, 30-60 minutes are added for each window). Often, fogging of the glass unit occurs in a window installed using this method. In addition, the appearance of the glazing beads may be damaged (scratches, chips) if they are removed/installed carelessly. It is important to perform all actions clearly and carefully. After removing the bags, you need to put them in a safe place where there is no chance of accidentally touching them and breaking them.
Advantages and scope of application of the method: installation of windows with unpacking is more reliable and provides a strong fixation of the frame to the wall. This method should be chosen in the following cases:
— it is planned to fasten windows in multi-story buildings (from the 15th floor). When installing windows on the lower floors, where there is no wind and gusts of wind, they do not need to be unpacked;
— installation of structures of considerable size is to be done. However, in this case, combined installation is allowed (the balcony block is attached without unpacking).

Window installation method without unpacking
This method does not require disassembling the structure. That is, there is no need to remove double-glazed windows and glazing beads. The frame is secured to the wall not with dowels, but with fasteners pre-installed on the outside of the wall.

Advantages and scope of application of the method: Installing windows without unpacking saves time, shortening the process as much as possible. This method is recommended for use where there is no need for increased fastening strength: when replacing standard windows in private houses, and also, as mentioned earlier, in multi-storey buildings below the 15th floor.
Installation of windows with and without unpacking: sequence, features, advice from professionals
The installation of plastic windows is specific, so this work requires a special set of tools and materials, without which it is almost impossible to install windows correctly and accurately. If you can’t buy the things you need in a specialized store, you can contact a window company - the professionals will definitely find what you’re missing.
- plumb and level
- screwdriver and hammer drill
- drill with a set of drills
- gun and mounting foam;
- hacksaw or jigsaw
- small crowbar or pry bar
- silicone gun
- chisel or knife with a wide blade
- mounting wedges
- tape measure and pencil
- roll moisture-proofing material
- sheets of iron (galvanized) and metal scissors (needed for making drains yourself)
The main stages of installing PVC windows:
- dismantling the previous structure and window sill;
- preparing a new window for installation;
- marking the frame for subsequent fastening;
- fixing fasteners to the frame;
- making holes for fasteners;
- leveling the plastic structure;
- securing the structure in the opening;
- installation of low tide (can be done at the end of the process);
- intermediate adjustment of fittings;
- foaming the cavities between the window opening and the frame;
- window sill installation;
- final adjustment of fittings.
Each stage of installing a plastic window should be considered separately.
Dismantling old window structures

Preliminary stage: preparing the window for installation
Windows with movable sashes are mounted closed. When installing a window open, there is a risk of deformation of the structure (the foam that will fill the gap between the opening and the frame can bend the frame). After foaming, the window is left for 12 hours, during which it cannot be opened. And to avoid accidental opening of the sash, you can postpone the installation of the handle until the installation of the window is completed.
It is not recommended to remove the tape that covers the surface of the window to protect it from damage until the installation of the structure and finishing of the slopes are completed.
PVC window installation sequence
Marking on the frame for fastening points
We retreat 5-15 centimeters from the corner of the frame and mark a place for the outermost fixing element. The frame needs to be fastened on 4 sides, the fasteners are located every 70-100 cm. If a stand profile is used, the frame is not fastened from below.

Fixing the fastener to the frame
Fastening elements include self-tapping screws, anchor plates, and U-shaped hangers for drywall.

Anchor plates and hangers have the same price - $0.05 (wholesale), $0.15 (retail). However, anchor plates are thicker than hangers. When purchasing, give preference to products made from thicker metal.
The fastener must be tightly secured in the metal frame frame. In order for the element to secure well, the screws must be used for metal. Such products have a drill at the end and a diameter of 4 mm. You can also use simple self-tapping screws, only in this case you need to first mark the holes in the frame with a drill.
Applying recesses for fasteners
We place the frame with the fasteners attached to it in the window opening, then knock out recesses in the opening in the appropriate places (depth 2 - 4 cm, width similar to the size of the fasteners). The fasteners will later sink into these recesses. By completing this procedure, we will make it easier for ourselves to finish the slopes.

Tip: when installing a window without a mounting strip, you should place blocks of wood or other dense material under it so that it rises to the height of the window sill. Then it will be possible to attach the window sill not to the window frame, but under it. If there is a mounting plate, the frame will automatically rise to the desired height. Typically, the mounting strip is already fixed to the frame and does not require additional fixation.
Leveling the window structure
This stage is the longest in the entire window installation procedure. However, by aligning the window in the vertical and horizontal planes, we automatically give it the correct rectangular shape. To level the structure, you need wooden wedges or bars that are placed under the frame. The first pair of lower wedges is set, then you can immediately fix the window from above with an anchor plate. Next we place two wedges at the top, then on the left and right at the bottom and top of the window. If there is an impost, you also need to put a wedge under it. During these actions, it is important to ensure that the vertical posts do not deviate to another plane. It is convenient to level the window with two people, when one supports the structure, the second inserts wedges.

Attaching the window to the opening
Having achieved a perfectly level position of the window, i.e. Having set it correctly in level, we can proceed to fastening the structure. To do this, use dowels (diameter 6-8 mm, length 75-80 mm) or anchors (diameter 6-8 mm). The latter have a higher cost, but provide more reliable fixation. They are recommended to be used if the wall consists of shell rock, brick or foam concrete. Fastening on anchor plates is used if the block structure contains a thermal insert and the frame in the mounting plane cannot be mechanically secured. A dowel driven into concrete can withstand a load of up to 60 kg, which is quite enough to fix a window. For wooden walls, you can use screws with a diameter of eight millimeters.
Advice: do not immediately tighten the screws on the sides of the frame completely, leave 1 cm until they stop. There is no need to screw in the construction screws in the upper part of the structure yet. The frame will not go anywhere, and you will have the opportunity to check the uniformity of the gaps on the sides and, if necessary, move the frame in one direction or another. After the final fastening, this will be more difficult. If the uniformity of the gaps is satisfactory, the horizontal/vertical structure is maintained, you can completely fix the frame by screwing in the screws on top and tightening the remaining screws on the sides. After this, it is worth checking the horizontal and vertical structure again.
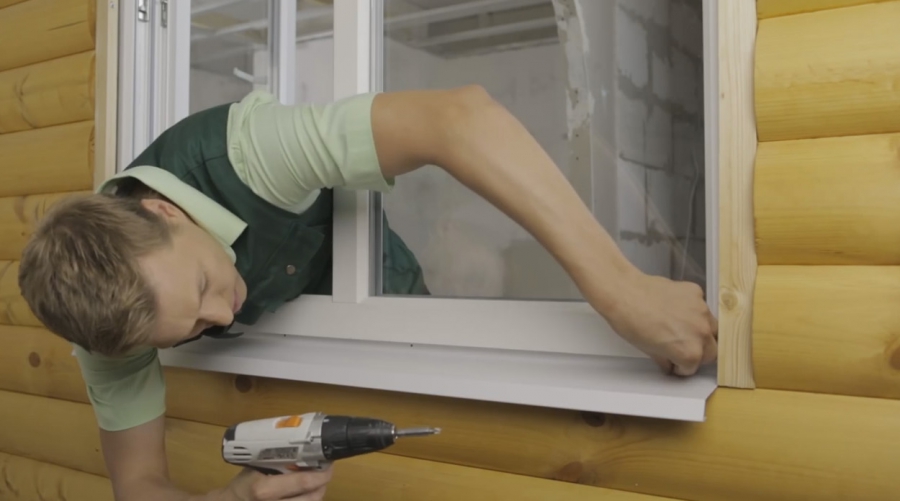
Fastening the ebb of a plastic window
Installation of ebb tides can be done at the very end. You can buy the ebb ready-made or make it yourself. It is best to secure this element under the window - this will prevent the penetration of water where it connects to the frame. Upon completion of the installation of the drain, the space between it and the profile is filled with foam. If it is not possible to attach the ebb under the frame, it is fixed directly to it, for which 9 mm metal screws are used.
Intermediate adjustment of fittings
It is necessary to tighten or loosen the window hinges so that the sash moves silently and freely when opening and closing. An open sash should not slam shut on its own. Correctly adjusted hinges will allow it to remain in the desired position.
When moving, does the sash “strike” where the locking hardware is installed? Move this element a little lower or higher.
Foaming the gaps between the opening and the frame

It is important to fill the gaps so that there are no voids left. Large cracks (more than two centimeters) are foamed in several stages, with a break between them of two hours. With this approach, there is no danger that the foam will deform the window as it expands. In addition, the consumption of polyurethane foam is saved, there is no excess that has to be cut off, and the quality of the assembly seam improves.
Since the foam hardens under the influence of atmospheric moisture, a lack of humidity in the room can lead to poor-quality polymerization. To avoid this, you need to lightly spray the area between the window opening and the frame with water before foaming, and after filling the cavity, spray the surface of the foam itself with water. If the air temperature during installation does not exceed five degrees, then winter or all-season foam is used. In warmer weather, you can use summer foam.
After polymerization of the foam, it is necessary to protect it from exposure to ultraviolet radiation. This stage can be combined with finishing the slope. But if you don’t want to make slopes yet, or plan to do it later, then the foam needs to be covered immediately, since it quickly collapses due to exposure to direct sunlight. In this case, we prepare a cement-sand mortar at the rate of 1 part cement and 2 parts sand, or dilute tile adhesive and cover the foam with any of these materials. In addition, you can purchase PSUL tape (vapor-permeable self-expanding sealing tape) at a hardware store and cover the polyurethane foam with it. However, the cost of the tape is quite high (from $3 per linear meter), so the first options are used more often.
Window sill installation
1. Trimming. The window sills have a standard length and width and have a good margin, both in length and width. Before installation, the window sill is cut using a jigsaw, grinder or saw with small teeth.

2. Leveling. We move the window sill to the support profile and level it using wooden blocks or other available materials.

We cover the side sections of the window sill with end caps. It is better to glue the plugs to the ends with super glue.
By lightly pressing the window sill with your hand, we make sure that it does not sag. In some cases, the window sill is not installed level, but at a slight angle (no more than 3 degrees) “from the window.” Thanks to this slope, possible condensation does not flow under the window.
We foam the cavity under the window sill.

After foaming, place something heavy on the surface of the windowsill (you can use plastic water bottles or books for this purpose) and leave it like that for 0.5 days.

If you do not press down the window sill with a load, it will bend upward under the influence of foam.
3. One day is enough for the foam to completely harden. After which its remains, sticking out unsightly from the crack under the window sill, need to be cut off using a utility knife.
4. If the window sill was initially uneven, then during installation there may be a gap left between its upper part and the frame. It is carefully filled with silicone. It is worth considering that this material has low biostability and can turn black from fungus. A gap will not appear if galvanized iron plates in the shape of the letter “Z” are fastened to the window sill profile in advance (before installation). In addition to the fact that these plates will allow you to grind the window sill tightly, they will simplify the task of leveling it.

Final window adjustment
At this stage, you can remove the protective tape from the window structure and finally screw on the handle. If finishing the slopes is postponed, do not remove the tape until all finishing work is completed.
Possible errors when installing windows
Here we list the mistakes that are often made when installing windows and can negatively affect the ease of use and service life of the structure:
- Installation is carried out with glazing beads facing outwards. This reduces the window's burglary resistance, since in this case the beads can be easily removed from the outside and the glass unit can be pulled out.
- The window is poorly aligned, making it difficult to open and close.
- The polyurethane foam is not protected from the sun's rays, as a result of which it is destroyed.
- Due to incorrect measurements or too low fastening of the window structure, the window sill cannot be placed under the frame and must be attached directly to it.
- The window structure is not fixed by any fasteners and is held in place only by polyurethane foam. Then cracks may appear on the slopes, since foaming is not a full-fledged fastening. Over time, it loses strength and the window becomes so mobile that it can fall out.
We hope that after reading the article you will be able to successfully cope with the installation of PVC windows. And even if you decide to contact an installation organization, you will be able to understand and control this process at all stages.
Premium German brand on the Russian market since 1995. With VEKA you get true German quality from a company with a 48-year history around the world.
- ALL profile systems of the highest class “A”
- ALL are made frost-resistant and marked with the letter “M”
- ALL have maximum 4-sided steel reinforcement
- Uniform quality standard regardless of country of production
The more air chambers, the less air exchange and, accordingly, the higher the thermal insulation.
The wider the profile and the greater the installation depth, the higher the thermal insulation.
Profiles ONLY of the highest class “A”
According to the thickness of the internal walls, ALL of our profiles are of the highest class “A” - the thickness of their front wall is at least 3 mm.
- class “A”: front wall not less than 3.0 mm
- class “B”: front wall not less than 2.5 mm
- class “C”: wall thickness is not standardized
Please note that 80-90% of the Russian market are classes “B” and “C” and only 10-20% are class “A” profiles. At the same time, VEKA’s assortment includes ONLY class “A” profiles.
We fundamentally DO NOT use profile systems of classes “B” and “C” (with a front wall width of less than 3.0 mm).
ONLY frost-resistant profiles
According to GOST 30673-99 “PVC profiles for window and door units” for resistance to climatic influences, ALL of our profiles are “frost-resistant” - for areas with an AVERAGE monthly air temperature in January BELOW minus 20°C.
GOST standards for different classes:
- normal version “N”: the average temperature in January is minus 20°C and above
- frost-resistant version “M”: the average temperature in January is lower than minus 20°C
Our assortment includes ONLY frost-resistant profile systems marked with the letter “M”.
Heat transfer resistance (thermal thermal resistance) is the main thermal insulation coefficient. It is determined by the ratio of the temperature difference between the outside and inside the room to the heat flow passing through the window. The higher this number, the better the insulation performance.
Evolutionary double-glazed windows SmartGlass 2.0
Our multifunctional double-glazed windows work for you both in winter and summer. In winter, the spraying of silver particles retains up to 90% of the thermal energy of heating devices, and in the summer, a double-glazed window reflects 25% more solar heat than conventional plastic windows.
- 42% more HEAT in winter (energy saving properties)
- 25% less HEAT in summer (sun protection properties)
All our double-glazed windows contain special energy-efficient glass. We DO NOT use regular glass even in the most basic configurations.
AirDrive I, II and III climate control systems
Optimal ventilation mechanisms are built into the windows - the sashes open slightly by 1-5 mm, depending on the selected mode. These are NOT external devices (combs or valves), but BUILT-IN ventilation fittings.
Three options:
- AirDrive I: slot ventilation (1 mode)
- AirDrive II: discrete multi-stage ventilation (3 modes)
- AirDrive III: discrete multi-stage ventilation (5 modes)
We try not to place combs based on their appearance (only at your request). In principle, we do not use valves due to the fact that they violate the integrity of the window, reduce its tightness and strength (since the profile and its reinforcement are drilled through).
MAXIMUM steel profile reinforcement
Reinforcement is a steel frame inside a PVC profile. This is what gives the structure rigidity. The more steel and stiffening angles, the more reliable the window geometry.
Types of reinforcement:
- Square – 100% reinforcement on 4 sides, 4 stiffeners (maximum)
- U-shaped – 75% reinforcement on 3 sides, 2 stiffeners (regular)
- L-shaped – 50% reinforcement on 2 sides, 1 stiffener (very, very bad!)
All our profiles are reinforced to the MAXIMUM - on 4 sides and always with 4 stiffeners.
VEKA technologists managed to achieve a compromise between the unpretentiousness of the matte texture and the spectacular gloss.
Pleasant shine and low sensitivity to external influences are the most noticeable feature of our window systems.
The VEKA profile complies not only with the Russian GOST, but also with the European RAL building standard.
Buying and installing new windows is not cheap, and a significant portion of the cost comes from installation fees. You can reduce costs by doing this part of the work yourself. We will tell you how to install a plastic window yourself, providing step-by-step instructions with photos.
Measurements required for the manufacture of a plastic window
The ease with which you will succeed or fail will subsequently depend on how correctly you take the measurements. After all, having made a larger window block, you will be forced to increase the opening, and if you make a smaller error with the dimensions, you will be forced to increase it.
It is necessary to determine the dimensions of the future frame based on the type of windows, which are:
- with a quarter, i.e. with a half-brick protrusion, which is located outside the opening and against which the window frame rests. Such windows are present in almost all typical buildings;
- ordinary, i.e. without protrusions. This design is used in buildings constructed according to individual projects.
Measurements of a regular window
Using a tape measure, measure the length and width of the window opening, add 5 cm to these indicators (per polyurethane foam) and write down the data obtained. In addition to the dimensions of the window frame, you need to measure the depth of the slopes, as well as the depth and length of the window sill. The last parameter is calculated based on the distance between the boundaries of the vertical slopes, to which 8-10 cm are added.
Quarter window measurements
In this case, you will have to measure the distances between the horizontal and vertical edges of the protrusion and add 5 cm per polyurethane foam to the resulting figures.
The video will tell you more about the nuances of measurements:
When ordering a metal-plastic window, do not forget to discuss with the manufacturer the number of double-glazed windows and the profile size, as well as the list and quantity of fittings and fasteners. If the climate of your area is not severe, and the windows do not face the roadway, feel free to order two double-glazed windows and a profile 6 cm wide. The lower the temperature outside the window and the more noise on the street, the greater the number of double-glazed windows and the size of the profile.
The procedure for dismantling the old frame
To install a plastic window yourself, you need to get rid of its wooden predecessor. Dismantling should be done carefully so as not to dismantle half of the wall, which will then have to be restored, wasting time, money and effort. At the same time, remember about safety precautions, because working with glass is very dangerous, and the slightest mistake can land you in a hospital bed.
First, remove the opening parts of the windows from their hinges. Remove the glass by first removing the glazing beads. Using a grinder or hacksaw, make cuts in the frame and other parts of the window unit.
Using a pry bar, remove the elements of the old structure from the opening, which is then thoroughly cleaned of construction debris and dust.
Now it's time to find out how to install a plastic window yourself.
Installing a plastic window with your own hands: instructions
To install a plastic window yourself, prepare the tools and materials you will need during installation:
- self-tapping screws (4x35 mm, 4x25 mm);
- screws (5x60 mm, 3.8x25 mm, 3.9x25 mm);
- anchor plates;
- polyurethane foam;
- waterproofing and vapor barrier tapes;
- mounting wedges;
- low tides;
- windowsill;
- plumb line;
- level;
- PSUL;
- perforator;
- screwdriver;
- screwdrivers;
- a hacksaw with a fine tooth for cutting the window sill;
- tin snips to trim the flashing.
Before installation, remove the sashes from the window block.

Install the mounting plates. The procedure is as follows: place the plate along the end of the window block, then turn it with the other end towards the room, fix it with a self-tapping screw (4x35 mm).
Please note: the distance between the plates should not exceed 600 mm.

Before you begin installing the structure in the opening, you need to apply marks for fasteners and PSUL. Align the position of the structure in the opening (this is why a plumb line and level are needed), taking into account the following: the maximum deviation from the horizontal or vertical should not be within 1.5 mm per 1 m of the structure, but not exceed 3 mm over the entire length or width of the product. Secure the frame using mounting wedges.

Bend the plates and mark with a pencil the places on the slope where they will be attached.

If your window is a quarter window, then mark the outline of the adjacent opening on the outside of the frame.

Remove the frame and drill holes in the places you marked, where the anchor wedges will then be inserted.

Drive dowels into the resulting holes.

Use a brush and vacuum cleaner to get rid of dust. Apply sealing tape to the frame. In the case when you are dealing with a quarter window, the tape is glued to the outer part of the frame at a distance of 3-5 mm from the previously outlined opening contour.
In windows without a quarter, the outer seam is insulated using special moisture-proofing sealants after the structure has been installed.
Secure the window block in the opening using mounting wedges and remembering to check the correct position.

Fix one top side plate at a time and measure the diagonals of the window block. Their difference should be within the following limits:

Screw on the remaining plates and remove the wedges, leaving only the bottom and diagonal ones, then proceed to foaming.

Trim off the excess foam and stick a vapor barrier tape on the side of the room, overlapping the wall by 10-20 mm.

Attach waterproofing tape to the outside.

Set the tide. Insert it into the groove and screw it using self-tapping screws (4x25 mm).
Hang the shutters and then install the window sill. Adjust the handles if necessary.

You see, install a plastic window yourself not that difficult. The main thing is to have the desire and follow our advice.
Take it for yourself and tell your friends!
Read also on our website:
show more
Until 2003, the installation of PVC windows and balcony blocks was not regulated by the state. Window installation specialists were guided by the technology proposed by the manufacturers of these structures. Whether she was wrong or not is difficult to judge. But the number of complaints about freezing, blowing and leaking frames exceeded acceptable limits. In order to eliminate these problems, GOST 3071-2002 was adopted at the beginning of March 2003, and the installation of windows in accordance with GOST became mandatory.
What is installation of a PVC window according to GOST
The introduction of a document regulating the installation of window joints and connections at one time caused a lot of controversy and disagreement. Companies specializing in window installations were unhappy with the upcoming costs of purchasing additional materials and increased labor costs.
The fact is that the state standard has approved several standards requiring the use in installation of materials that were not previously used, or were used reluctantly. This entailed an increase in the cost of the work of the performers and, accordingly, the consumer. Which, it was believed, could lead to a decrease in demand for window services.
But the worries were in vain. It was consumers who were the first to appreciate the benefits of GOST. Which is not surprising, since the document is entirely focused on improving the operating conditions of window and balcony units. What are these improvements?
- Installation of plastic windows in accordance with GOST with steam and waterproofing of gaps. The document provided a definition of an assembly seam, indicating the materials required for its construction. Now the correct seam should consist of three layers: outer, waterproofing and vapor-permeable.
- Recommended clearance parameters are indicated.
- Requirements for surface preparation have been determined.
- Acceptance rules have been established.
- The maximum permissible distances between attachment points are indicated. For a plastic profile this is 70 mm.
- A list of actions for testing the quality of structures is given.
- The maximum service life of the materials used is indicated: at least 20 years.

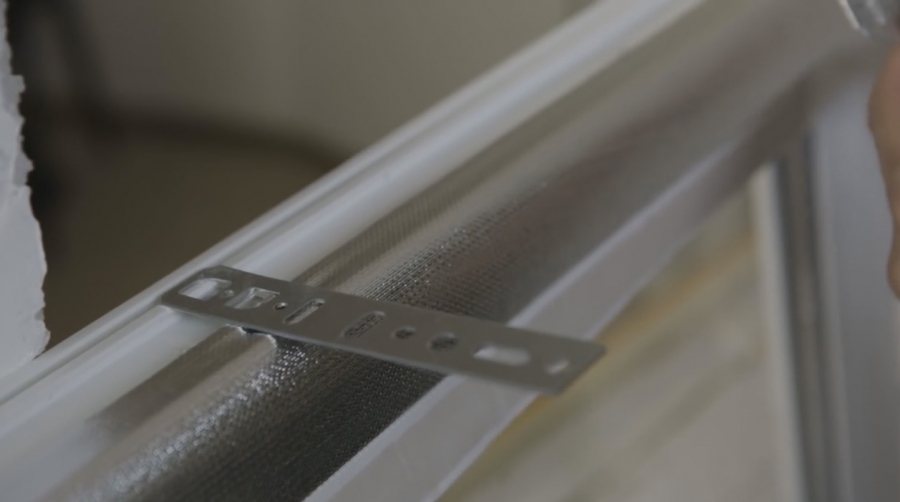
We did not ignore such an important element of the window design as the ebb. According to GOST, it is now protected from below with diffusion tape made of polyester. This ensures strong fixation of the metal sheet to the wall and frame. The presence of a tape on the lower ebb plane significantly reduces the noise from raindrops.
Application of standards in practice
Since March 2003, installers began to work in accordance with accepted standards. But for a consumer unfamiliar with the intricacies of this work, the question inevitably arises: what does it mean to install a window according to GOST? Knowing the answers will help you track the correctness of the installation and ensure its quality. The first thing you need to know is that all seams of the window unit should now consist of three parts.
- The central one is made of polyurethane foam, which has high frost and moisture resistance.
- The outer one is made of waterproofing tape.
- The inner one is made of vapor barrier tape.
The basic principle of installation can be explained as follows: the inner part of the seam must have low thermal conductivity, and the side parts protecting it must have vapor permeability. In this case, if moisture penetrates the polyurethane foam, it will freely escape in the form of steam and will not cause harm to the insulating layer (spray foam).
Advantages of installation
There are several advantages compared to conventional professional installation. But they are all so important that it is unwise to ignore them.

- Subject to compliance with all Gosstandart standards, freezing and leakage of seams is excluded. Consequently, and window frames.
- The possibility of mold and mildew formation is excluded.
- The insulating layer (spray foam) is protected from moisture and will not collapse prematurely. If installed incorrectly, with no protective tapes, yellowing of the foam can be observed. Under the influence of moisture, its structure becomes loose and destruction processes begin. Such foam loses its thermal insulation properties with all that it entails: the windows begin to freeze, leak, and are no longer a reliable barrier to the wind.
- The ebb is connected to the wall more tightly by the frame, which provides an additional thermal insulation effect and increases the service life of the window unit.
There is another important advantage of complying with the requirements of Gosstandart. If the consumer remains dissatisfied with the quality of installation and orders an independent examination service, the company that installed this window will, at best, face re-installation. And the worst thing is considerable expenses.
Materials required when installing windows
Among installers of plastic windows, GOST 3071-2012 is called “tape”. This is due to the fact that, in accordance with the requirements of this document, it is necessary to protect the seams with “ribbons” - narrow-width products: vapor barrier, self-expanding and diffusion.

Materials for installing plastic windows according to GOST:
- PSUL tapes (self-expanding sealing);
- GPL (vapor barriers), made of butyl rubber or aluminum foil, for internal protection of seams;
- diffusion polyester for external protection.
PSUL tapes are a self-expanding material and are sold in rolls. During installation, it is extremely important to choose the degree of increase in the volume of the tape. This indicator is always indicated on the packaging. So, for gaps 10 mm wide, you need to choose a tape with an expansion range of 30-40 units. The most popular brands of tapes are Profband, PSUL-EUROBAND, Liplent, Robiband.

Polyethylene tape GPL (water vapor barrier) is made on the basis of foam rubber. On one side there is an adhesive base, in the middle there is a vapor-permeable material, on the other side there is a laminated base and inserts made of metallized material (foil). The purpose of these tapes is to reflect heat back into the room and protect the polyurethane foam from moisture. Popular brands: TYTAN Professional, KLEBEBANDER, “Germetic-Abris”.

Diffusion tapes are laid under the tide to protect the seam from moisture on the outside of the window. These materials are also made from butyl rubber, but they have two adhesive bases: on each side. Therefore, the protective material is firmly glued to both the ebb and the opening. Popular brands: HAUSER, Robiband, Ultima, WS.
Installation technology according to GOST
Installation of plastic windows in accordance with GOST 30971-2012, the step-by-step technology of which is proposed, can be done independently.
Step 1: Use a stiff bristle brush or paint brush to sweep away dust and debris.
Step 2. The seams between the bricks are leveled with moisture-resistant putty.
Step 3. Cover the putty with a layer of primer.
Step 4. Open the window block and remove the sash.
Step 5. Remove the stand profile from the bottom of the frame.
Step 6. Glue the PSUL at the junction of the frame and the stand profile.
Step 7. If you are installing a balcony block, remove the connecting profile from the outside of the frame. At the junction with the opening, PSUL tape is glued along the entire perimeter. If you install a window, immediately glue the tape around its perimeter.
Step 8. Take a simple pencil and a tape measure. Mark the attachment points on the PVC profile. In accordance with the requirements of the standard, the distance between these points should not exceed 70 cm. The hole should be 150-180 mm from the corner of the frame.
Step 9. Drill holes. The diameter of the drill must be smaller than the diameter of the bolt or self-tapping screw.
Step 10. Support blocks are installed on the opening, which will be located under the frame.
Step 11. Insert the frame and fix it with self-tapping screws.
Step 12. From the street side, mark the places where the PSUL is attached.
Step 13. Remove the frame and, with a shift of 0.5 cm from the markings, glue the PSUL.
Step 14. Install the starting profile for the slopes on the frame.
Step 15. Cover the frame with GPL tape on the inside.
Step 16. Install the frame and level it. Drill holes in the wall for dowels and perform final fixation.
Step 17. Install the sashes.
Step 18. Fill the seam with polyurethane foam.
Step 19. After 15-20 minutes, the GPL tape is aligned along the slopes.
Step 20. GPL is installed under the window sill.
Step 21. Install the window sill.
Step 22. A diffusion tape is installed under the ebb.
Step 23. Attach the ebb.
Installing a window according to GOST, the instructions for which are given above, is a simple task. If you comply with all the requirements of Gosstandart, the window openings will be reliably insulated and sealed.
P.S. And for dessert, I suggest watching a video: Window installation according to GOST
Latest site materials
Pipes

Environmental studies
2017 has been declared the Year of Ecology in the Russian Federation. 2017 in Russia has been declared the year of ecology - Decree of the President of the Russian Federation According to the Decree of the President of the Russian Federation dated August 1, 2015 No. 392 “On holding the Year of Specially Protected Natural Areas in the Russian Federation”. Podo
cesspool

An example of preparing estimates in the Grand Estimate program
Recommended for use as a teaching aid when mastering the course “Practical skills in working with the GRAND-Smeta software package.” Designed for users of all categories with any level of computer knowledge. The presentation is based on
Equipment

Start-up and commissioning works Evaluation of commissioning works
Commissioning work is a set of works that includes checking, adjusting and testing electrical equipment in order to ensure electrical parameters and modes specified by the project. Commissioning work during the installation of electrical installations is the final stage
Well and well

On filling out an invoice for construction work and the right to deduction under such a document
Resolution of the Nineteenth Arbitration Court of Appeal dated July 21, 2011 N 19AP-7149/10, Voronezh Nineteenth Arbitration Court of Appeal composed of: presiding judge Osipova M.B., judges Skrynnikov V.A. Mikhailova T.L., at ve
Pipes

Energy-informational causes of diseases
it is read that the Left hemisphere of the brain and the Human Consciousness are called upon to serve the processes of our life, while the Right hemisphere of the brain and the Subconscious are part of the planetary mechanism. These are, as it were, the nerve cells of a planetary organism
Heating

The essence and features of personnel rotation as a way to improve management efficiency. Personnel rotation in a medical organization
Types of personnel rotationLike any concept, rotation presupposes a whole system of types. There are two main types: vertical and horizontal. Vertical rotation is a simple promotion within the same type of activity, in the process