Correct location of electrics in the apartment. Electrical wiring diagrams in the apartment
Electrical wiring in residential premises must comply with the standards in force in the Russian Federation. What types, diagrams, differences in wiring depending on the number of rooms, tips and other important points, all this will be discussed below.
Rules for electrical wiring in an apartment
Installation of electrical wiring in apartments is a large-scale undertaking. This procedure requires complete confidence. If it is not there, it is recommended to contact specialists or invite assistants. Only a well-chosen scheme will protect against problems in the future and ensure smooth operation.
Distinctive features of modern electrical wiring
At the end of the 20th century there was a breakthrough in modern household technologies. In addition to televisions, other devices began to be used inside homes:
- Wireless connection.
- Powerful household appliances.
- Video surveillance and security systems.
- Computers.
Therefore, work with the installation of electrical networks has become more complicated. The principles of operation and arrangement remain the same.
Even the first stage - design - causes difficulties. It is necessary to know the locations of household appliances and the power they absorb. The lighting system for each room is thought out at the same stage.
 Now they use not only power, but also low-current systems. These are wires for TVs, telephones, and computers. This also includes acoustic and security equipment. Power and low-current systems are not separated. The power source for the devices is a classic 220 V network.
The number of devices and devices with simultaneous operation is changing upward. Previously, one chandelier was enough, now local or a system of spotlights is added to the overhead light. The total power consumed by the devices also increases.
Electrical wiring diagram in an apartment by dimensions
Let's look at the diagrams of several options. Their use in practice is not associated with problems
1 room
 Under such conditions, devices are in minimal quantities. There will also be fewer connection lines. But it is better to continue to follow the general principles; you should not create separate lines for rooms like the bathroom and toilet.
Doing the following helps when drawing up diagrams for standard one-room spaces:
- Selecting the parameters with which the electrical network will work.
- Load calculation, selection of cable and suitable RCD model.
- Selecting a connection scheme, with 1 or several networks.
Electrical network and its parameters
It is difficult to calculate in advance which devices inside the apartment the guests will choose. But to calculate the total power, it is important to know at least what the approximate amount will be. Do not forget about the placement of equipment. Extension cords and additional filters spoil the surrounding interior and create operational problems.
The method of laying cables is selected separately. There are closed and open options. When open, the wiring is laid on top of decorative materials. Then part of it is covered with plastic boxes, and the other part is left in plain sight.
These are the advantages:
- Seamless connection of additional lines if necessary.
- Fast installation.
- Installation at any time during repairs.
 If the wiring is hidden, then there is a need to groove the walls. Then the wires are disguised under the finishing trim. The version of suspended structures is the simplest - in this case, plasterboard boxes and tension structures become the cover.
Hidden wiring also has certain advantages:
- Maintaining the integrity of the interior design.
- Increasing tolerances to nominally allowed currents.
- Reduced performance requirements that are adhered to during installation.
Hidden wiring is a traditional option for recently purchased apartments. The open option becomes, rather, an exception.
How to calculate the load in the electrical network?
To make the final calculation, the following factors are taken into account:
- Mains voltage.
- Rated current.
- Power of electrical receivers.
It is better to use ready-made tables, although there are many calculation methods.
 The best option is to seek help from an engineer, or use specialized computer programs. They are more likely to get an accurate result.
When networks are divided into groups, it is impossible to do without connecting a 25 A machine for each individual line. The rated current is taken into account in the total under all circumstances. 16 A is enough for lighting networks.
Which scheme should you choose?
Power source – one line or several. The first option is unacceptable for modern conditions - after all, a separate line is now required even for one device. Each of them has sufficient power.
Other schemes have more connection points and more lines.
Two-room
 The principles when creating an electrical wiring diagram do not change depending on the number of rooms. There are some features that need to be taken into account:
- It is recommended to separate the wires into two groups if the bathroom is separate.
- Three lines are the minimum required for a kitchen.
- Lighting is also divided into individual rooms.
- The network with sockets is divided according to the number of rooms.
Security equipment is also included in the wiring diagrams, because housing with two or more rooms is considered elite.
Three-room apartment
 Here the same rules are followed as in the previous case.
Apartments
The same requirements and rules apply to them as described above.
Is it possible to draw up a wiring plan yourself, and how much will it cost?
This option is acceptable if the master is confident in his abilities. As for the prices for work and implementation of schemes, they are set individually for each client. And they depend on the characteristics that the network will have:
- A type of building or room.
- Scope of work.
- Quantity of material.
- Type of installation.
- Used sockets.
These factors also influence what the scheme will be like and whether it is difficult to implement. It is better to conduct a consultation in advance so that there are no questions.
Electrical wiring in groups: what is the best way to do it?
 When divided into several lines, control of wires and components is simplified. If a malfunction occurs, one group is switched off. The remaining parts function as usual.
Stationary household appliances
Powerful appliances are located in the kitchen and bathroom area.
When renovations are carried out, the kitchen area requires a separate connection. If one device in this room breaks down, it is replaced. Then one protective device is turned off, the whole room is not deprived of energy.
Difficulties arise due to the fact that the network connection points for electrical appliances are often in places with difficult access. The source of faults is not only devices, but also wiring. In this case, it is simply easier to move one lever on the protection device.
Dedicated line for the kitchen
The line for this room traditionally operates with the heaviest load. Even if the units are not in use, there is a constant connection to the network. This:
- Toasters.
- Microwaves.
- Hoods.
- Dishwashers.
- Cooking plates.
- Ovens.
- Refrigerators.
 Many people buy multicookers and electric stoves and other similar devices.
You can turn on several devices at the same time if you use one cable with increased power.
Water heaters and lighting devices are connected separately. Otherwise, the load on the network will be too great, and at some point everything will shut down.
One or more lighting groups
Devices can be combined into one group if the following conditions are met:
- Using a six-arm chandelier for the hall.
- Low power overhead lighting for the bedroom.
- Additionally, two night lamps-sconces are used.
A separate group is organized for each room if there are several lighting sources.
Room with high humidity
 For electrical devices and cables under such circumstances, strict requirements apply. Additional risks arise due to the close proximity to water. When drawing up electrical wiring diagrams, taking into account the following rules helps to achieve a suitable result:
- Distribution boxes are required.
- Sockets for electrical appliances are also installed with the utmost care.
- The installation location of the switch is selected taking into account the requirements and conditions.
- The installation method is selected in a hidden version.
The degree of protection for each outlet is at least IP44. It is recommended to purchase special devices complete with a cover that protects against splashes.
The wiring will have to be replaced with a three-wire one if there is no grounding due to the outdated original circuit.
Multi-room multi-storey apartments
 Options:
- Directly on the surface, in corrugated pipes. The solution is suitable for rough walls, which are then covered with plaster or other types of materials.
- Creating grooves in the wall for later laying wires.
- Along the floor, the shortest route.
The choice is determined by the material of the floors and the properties of the main walls.
How to properly distribute wiring in apartments with access to the attic or attic?
The first step is to determine the number of outlets needed for the room. The plan is drawn up depending on the current needs of the residents. Separate connection on separate wires is recommended for the following devices:
- Boilers.
- Heaters.
- Electric stoves.
One appliance requires one main socket and at least two spare sockets. Six sockets and ten points for lighting fixtures are a standard design when arranging attics.
The cable route should be located at a distance of 10 to 30 cm from the floor. The main thing is that the cable can be disguised.
How to properly install wiring in a new building?
 The main thing is to take into account the wiring in the apartment, including the following elements:
- Fire alarm network.
- Radio broadcast network.
- Telephone lines.
The situation is only permissible with the power cable at the apartment entrance. It is designed to ensure that consumers receive the necessary power. The owner of a residential building independently installs meters, sockets, switches, and installs wiring. This option is appropriate if the apartment is transferred without finishing.
Is it worth completely changing the wiring in an old apartment or house?
In the case of aluminum, replacement is recommended in full. If copper is used, the final decision depends on the condition and age of the elements. Oxidation, burning and other similar effects are a sign that replacement is necessary. Situations are acceptable when only a part changes and is reported.
 Here are some principles of work that help achieve results:
The bathroom switches go to the corridor.
- A separate project is being prepared for low-current systems. Complete protection against interference is provided by separate wiring of low-current and power lines.
- The more outlets, the better. In this case, you can do without extension cords.
- 0.8-1 meter from the floor is the height where installing switches will give optimal results.
- Sockets - at a height of 0.3-1 meter from the floor.
- The circuit is not complete without power points and installation sites for high-strength devices.
- Division into groups.
When repairs are being made, the diagram will become the main guideline, so they keep it with them.
 One of the significant points is connecting the wires to each other. For this purpose, installation or distribution boxes are used. A direct version, with terminals and twisting, is also acceptable.
Using wallpaper and plaster to hide wires is a risky move. Otherwise, during repairs you will have to remove the cladding completely. Some electricians choose the option of installing mounting boxes for switches and sockets. Then the connections remain freely available. But cable consumption increases.
Heat shrinking is an option when connecting wires of one outlet line. Terminals with spring mechanisms help to mount lighting networks. There are other options:
- Traditional soldering.
- Crimping.
- Terminal blocks.
When the wires are connected and masked, the electrical installation work will be considered complete. A complete electrical panel has been created. You can change chandeliers or sockets or other similar details at any time. If the work is carried out correctly, then there should be no problems with access. Lighting fixtures and decorative elements are often installed after other stages have been completed.
The main thing is to remember safety rules when working with electricity. Then everything will be in order, and the system will have a long service life.
Useful video
In old buildings, electrical wiring is installed to provide electricity in the amount necessary to power devices with a total power of 1-2 kW per apartment. Such power does not meet the needs of modern man, and the wiring had to be replaced with new ones. In new buildings, the level of electricity consumption is taken into account, taking into account the use of air conditioners, computers, washing machines and other equipment. More reliable machines, modern RCDs, and copper wires are used. How is electrical wiring installed in modern buildings?
Condition at delivery stage
Wiring in any new building is already calculated at the design stage in order to ensure an uninterrupted, safe supply of housing. In this case, the power supply design takes into account the installation of all wiring in the building, including telephone lines, radio broadcast networks, and fire alarm networks. This option is used when apartments in new buildings are delivered on a turnkey basis.
The second option, according to which electrical wiring is carried out in a new building, provides for the introduction into each apartment of only a power cable designed to supply consumers with the required power. Further, the installation of meters, electrical installation products (sockets, switches) is carried out by the owner of the residential premises independently. In this case, either specialists are involved, or the work is carried out on their own if they have the necessary knowledge and skills. This option is appropriate if the premises are transferred to the owner without finishing, which is very often practiced in the modern housing construction market.
Regulations
The creation of a project and installation of electrical wiring in a new building is carried out in strict accordance with the requirements of the standards noted in the documentation. The main documents are:

The latest editions of the PUE require that wiring carried out in a hidden way in buildings under construction must be replaceable, therefore its installation is carried out in special electrical pipes made of polyvinyl chloride (PVC), which are embedded in building structures.
In new buildings, this work is carried out immediately after the construction of the building structure and closing of the openings. Very often they take place in parallel with heating installation work.
Electrical wiring technology
To begin work, you will need an electrical wiring diagram, which will show the mounting locations of sockets, switches, distribution boxes, and the lines along which the wires will be laid. The wiring parameters and characteristics are also indicated. The scheme is developed taking into account the requirements for future decoration of the premises, since some decisions when designing wiring will depend on the material of the structures and finishing materials.
Convenient location
The location of electrical installation devices must meet the needs of future owners of the new building and ergonomic requirements. In this case, the diagram must take into account the minimum distances between wiring elements and plumbing fixtures and gas pipelines. In agreement with the Energonadzor services, it is possible to install utility panels with electricity consumption meters inside the apartments of new buildings. Their location should also be reflected in the diagram.

In accordance with the diagram, the location of future electrical wiring is marked in the apartments of the new building, and the housings of sockets, switches, distribution boxes, and distribution panels are installed. Nests and niches for them can be made in the walls. In this case, the housings of the distribution boards must be made of metal and embedded in the structure using M150 grade mortar.
Wiring
Next, all sockets, switches and installation locations for lighting fixtures are connected with PVC pipes in accordance with the connection diagram. These tubes are buried in the wall structures. At the same time, gating is not allowed in load-bearing walls made of reinforced concrete panels. The tubes are installed under a layer of plaster. On ceilings, wiring is carried out in pipes embedded in reinforced concrete floors, or carried out in the voids of floor slabs. If the pipes were not embedded in the ceilings at the stage of erecting the building frame, then they are also hidden by a layer of plaster or behind the structures of future suspended or suspended ceilings in the new building. At each section, the tubes must be intact, without joints.
Connection and connection protection
At the next stage of work, all future distribution boxes, sockets and switches are connected to each other and to the installation sites of lighting fixtures using cables of the type and cross-section indicated in the diagram, pulled in tubes using special broaches. The ends of the cables are marked to avoid confusion when connecting.
 Next, the wires are connected in junction boxes. Making connections outside distribution boxes, as well as in installation boxes and housings of sockets and switches is not allowed.
Circuit breakers are installed in distribution panels to protect each individual circuit. For circuits in wet rooms, residual current devices (RCDs) or differential circuit breakers are installed.
In the utility panel, together with the meter, an input machine must be installed, which, like the meter, is subsequently sealed.
As-built documentation
After installing the wiring in a new building, it is necessary to draw up as-built documentation reflecting the location of the electrical wiring in the apartment. When the apartment owner installs furniture, interior items, conducts additional communications, and makes holes in the walls, he must know the location of the wires. Otherwise, they can be damaged, and repairs will require a significant investment of time and money.
Such documentation is carried out in the form of acts for carrying out hidden work, drawing up diagrams, and using photographs depicting electrical wiring elements before plastering.
 In addition to this, all automatic circuit breakers and RCDs are marked and signed in the distribution board according to the purpose of the circuits they protect.
The information specified in the execution documentation will subsequently be used when drawing up a technical passport for the residential premises (apartment).
But the existing project does not always satisfy the owner of an apartment in a new building. The owner may be dissatisfied with the quality of work, the reliability of the gasket, or the location of the meter or distribution panel. In this case, it becomes necessary to change the electrical wiring.
You can change sockets, switches, and make convenient wiring inside a new building apartment without permission. But you shouldn’t just interfere with changes in the wiring diagram outside the apartment.
Changes in the project
If the wiring in the building was carried out during the construction process, there is always a possibility that the owner of the new building will want to change it, based on his considerations of functionality and convenience.
Any changes in the electrical wiring diagram regarding its characteristics are considered a refurbishment of the premises, and must be made in agreement with local authorities based on their decision. This could be a change in the cross-section of wires, replacement of machines, distribution boards, cables, installation of an additional power line, and the like.
To do this, the owner submits:
- application for reorganization;
- purchase and sale agreement, deed of gift or other documents confirming the right to use the apartment;
- redevelopment project;
- technical certificate;
- consent of all family members of the employer;
The conclusion of the monument protection authority in the case of a new building is unlikely to be needed.
You will have to wait longer than a month for a decision – 45 days. Moreover, both permission and refusal may come. The countdown begins from the day the owner submits all necessary documents. The body authorized to carry out the approval, after making a decision, issues or sends a confirming document within 3 working days.
The document received by the owner will subsequently serve as the basis giving the right to reconstruct the premises.
From this day forward, it is allowed to carry out work on changing electrical wiring. It must be remembered that the new lines and installation parameters will be noted in the technical passport for the apartment.
It is impossible to imagine a modern apartment without electricity supply. But installing the wiring on your own is quite possible.
To do this, you will need to be patient and study a little about the methods and procedures for performing electrical work.
In this article we will tell you how to make, change or install (lay from scratch) electrical wiring from a panel in an apartment with your own hands.
The main regulatory document regulating the activities for the arrangement of electrical networks is Rules for the construction of electrical installations (PUE). Before you begin self-installation, you should familiarize yourself with the PUE and especially carefully study the sections related to the selection of equipment, installation rules and safety precautions.
Basic rules to follow when installing electrical wiring:
- , input panel, sockets and others key network elements are installed in easily accessible places.
- The switches are located on the side of the vestibule, inside the room. Installation height – 60-150 cm from the floor. Wires to switches are supplied from above.
- have at a height of at least 50 cm from the floor, the maximum permissible distance is 80 cm. Wires to sockets are supplied from below. Sockets must be located more than 50 cm from powerful current consumers, a gas stove and grounded elements related to other communications.
- Sockets are installed at the rate of 1 pc. for 6 m² of space, excluding the kitchen. In the kitchen, the number of sockets corresponds to the number of electrical appliances. Sockets cannot be installed in the toilet; the socket group in the bathroom is connected through a separate transformer, or a stationary extension cord with a plug is installed, which is plugged into one of the sockets in the kitchen as needed. In this case, it is advisable to separate it into a separate connection group.
- Wire routes must be strictly vertical or horizontal. Turns are made only at right angles. The location of all cables must be marked on the plan.
- Cable laying routes are located at a strictly defined distance from the load-bearing elements of the ceiling, pipes, and edges of openings.
- The wires are laid so that they do not come into contact with metal elements building structures.
- The distance between the wires laid in one channel is at least 3 mm, or each of them must have individual protection (channel or corrugation).
- Wiring and connections are carried out in junction boxes. All connections must be insulated; connections of copper and aluminum wires are not allowed.
- To attach protective and neutral conductors to devices, bolted connections are used.
Step-by-step wiring diagram
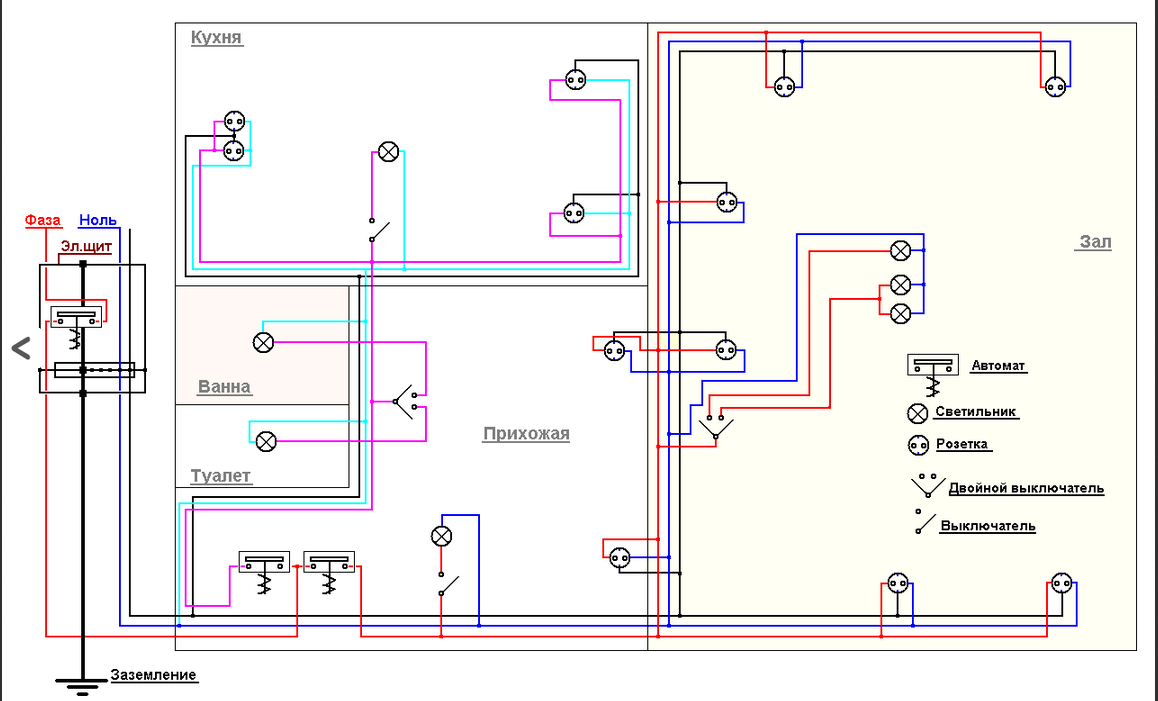
Let's look in detail at how to make electrical wiring in an apartment with your own hands. Proper design and thoughtful design is the key to the safety of apartment residents. In the process of developing a circuit, you can optimize the arrangement of internal network elements, correctly calculate the required amount of materials, and select the type of wire. Having a wiring diagram and plan will also protect you in case of future repairs, eliminating the risk of accidental damage during repairs.
For an example of a wiring diagram in an apartment with your own hands, see the photo:

If you lack experience at this stage, it is better to turn to qualified electricians, but it is quite possible to draw up a connection diagram yourself. The plan and calculation of the internal electrical network is subject to approval by the energy inspectorate, therefore, if there are serious errors, it will have to be redone.
How to properly organize electrical wiring in an apartment with your own hands from scratch, watch the video:
To prepare the diagram you will need a drawing and apartment plan. The plan should indicate the proposed location of furniture and large household appliances. Guided by the requirements of the PUE, lighting points, sockets and switches are marked on the drawing.
In modern practice connection is made in groups of points. In each room (except for the kitchen) there are two such groups: lighting and socket. In the kitchen there may be more connection groups, since some other powerful electrical appliances are recommended to be connected as a separate group.
To save materials, connection groups may look different:
- Lighting group of rooms, corridor and kitchen;
- Bathroom lighting group;
- Outlet group of the corridor and rooms;
- Kitchen outlet group;
- Electric stove.
At the wiring design stage, the power consumption and expected current in the network are calculated. This is necessary for correct and. When calculating the total power, absolutely all electrical appliances are taken into account available in the apartment, including a hairdryer and electric razor. The wiring must be able to withstand the simultaneous switching on of all current consumers. To determine the calculated current strength, the result obtained is divided by 220.
A residual current device must be installed on the highway to each connection group.Tools and materials
To connect the apartment distribution panel to the main panel in houses with three-phase power supply, it is recommended cable VVG-5 with a cross section of 6 mm², in houses with two-phase power supply - two-core VVG-2 of a similar cross-section.
The lighting part of the wiring is made of wires VVG-3*1.5 (three-core, cross-section 1.5 mm²), for the socket part, a wire with a cross section of 2.5 mm² is recommended. To connect the electric stove, wires with a cross section of 4 mm² are used.
A 16 A RCD is installed in the panel for lighting wiring, 20 A for the socket group. A 32 A machine is installed on the branch for the electric stove, but if its power exceeds 7 kW, you will need a 63 A device.The cable length is determined by simply measuring the distance from the switchboard to each connection point. About 4 meters of reserve are added to the final result. About a third of the resulting length goes to lighting, the rest is spent on connecting sockets.
The number of sockets, switches, junction boxes and other elements is calculated directly on the diagram. In addition, you will need socket boxes, terminal blocks, PPE caps, electrical tape, cable ducts, corrugations or boxes.
The toolkit includes:

- Grinder with a stone circle or wall chaser;
- Hammer;
- Bit;
- Phase indicator;
- Screwdrivers with insulated handles (phillips and slotted);
- Pliers;
- Wire cutters;
- Level;
- Portable lamp;
- Extension;
- Putty knife.
Marking and gating of walls
To mark, you will need a level, tape measure, chalk or construction pencil. In the places where the sockets are installed, draw 7x7 cm squares, if a double socket is to be installed, a rectangle 14 cm wide is drawn on the markings. Then cable routing routes are drawn on the wall in accordance with the plan.
Lastly, mark the location of the switches, marking them with squares, just like the sockets. 9x20 cm rectangles are drawn for distribution boxes.
 The holes for sockets and switches are marked with a core drill, then grooves are cut along the marked lines with a grinder.
The depth of the groove is at least 20 mm; the width of the groove depends on the number of wires that must be laid in a particular area. All wires must fit completely freely.
After cutting the grooves, all that remains is to knock out the grooves and all the intended holes. Grilling is a labor-intensive, dirty and noisy process, work should be planned during working hours and neighbors should be notified in advance.
Laying wires and accessories
First of all, the RCD, the number of which corresponds to the number of connection groups. A piece of wire with a cross section of 5 mm² is inserted inside the shield. Blue - attached to zero, white - to the top contact of the machine, grounding (yellow with a green stripe) - to ground. The RCDs are connected in series with a piece of white wire.
 It is recommended to start installing new wiring in an apartment with your own hands from the farthest connection point.
The wire is cut into pieces of the required length with allowance for connections, pulled into corrugations on the floor and then laid in grooves.
To connect sockets, a wire with a cross section of 2.5 mm² is used, from lighting fixtures and switches - 1.5 mm² wire. It is advisable to attach a tag to the end of each wire indicating the purpose and location of the connection group (point).
Wires in junction boxes are connected using PPE or simply well insulated. The main wire inside the panel is connected as follows: the blue conductor - to the neutral bus, the phase conductor, in red or brown insulation - to the RCD below, the grounding wire - to the ground below.
After this, the wiring is called and, if the installation is done correctly, all that remains is to call an electrician to connect it to the distribution board. How to properly install and lay electrical wiring in an apartment with your own hands, you can watch further in the video:
All work is performed only with working tools, the handles of hand tools must be insulated. For additional protection, rubberized gloves are required; wall-shaping work is performed with safety glasses and a respirator. Grooving at height is done from a trestle or from a stepladder with a side support.
In this video, an experienced specialist will tell and show how to change the electrical wiring in an apartment with your own hands:
Nowadays, a huge number of devices run on electricity. Therefore, there is often a need to supply electricity to the apartment or repair electrical wiring. This is quite a complex task, and it is best to entrust it to a professional. However, people who pretend to be electrical experts do not always actually be such. Therefore, you often have to do the wiring yourself. This article will tell you about most of the intricacies of this matter. Electrical wiring in each room has its own characteristics, so there are no absolutely universal ways to do it. However, the main points of conducting electricity into the house are similar.
First you need to connect the input cable (the wire that carries electricity from the power line into the house) to the . The panel contains an electricity meter, various protection devices, for example, circuit breakers or voltage stabilizers. There is also a node on the distribution (electrical) panel from which wires go to all energy consumers in the house (lighting devices, sockets). Moreover, it is advisable to connect one wire to the sockets, and another to the lighting devices, since not all lamps are designed for the voltage that should be supplied to the socket. But most modern lamps can still operate with this voltage, so it is not necessary to distribute the wires. All consumers should be connected in parallel, otherwise if one device fails, all of them will not work.
The shield can be located in a niche or hang on the wall. Moreover, a shield is hung directly on the wall only as a last resort - when the house does not have a special recess for it. The optimal location of the distribution board is in the hallway, at a height of about one and a half meters. If you install the panel this way, then you will always have access to the panel devices for inspection and repair, and it will be convenient to take meter readings.
Hidden and open installation of wiring in an apartment
Wiring can be open or hidden. The latter is more convenient, because all the wires are hidden and do not spoil the appearance of the rooms. That is why it is used in most apartments. And it is done at the time of construction of the building - the wire is laid in a special protective “sleeve” under the drywall, and then the surface is plastered. 
If you, and there is no wiring at all or it is open, and you want to make it hidden, then you must first make recesses in the wall about 2 centimeters deep, lay the wire in it and connect it to the energy consumer. However, you cannot lay short wires diagonally so that you do not have to use long ones - this is prohibited by safety regulations! The only correct option is vertical and horizontal wires.
It would be ideal to lay the wires in special protective sleeves, as is done in the construction of most houses - but this will greatly increase the cost of the work. Protective sleeves are expensive, but they allow you to replace the wire without disturbing the plaster. The wire can simply be pulled out of the sleeve, repaired or replaced, and then returned to its place. In addition, the protective sleeve will prevent the wire from being damaged ahead of time.
The input wire must have a cross-section of at least 6 square millimeters. It is usually made of copper, but sometimes aluminum is also found. Copper ones are much better, because their resistance is one and a half times less than the resistance of aluminum ones.
The wires that supply voltage to energy consumers can be thinner, and it will also be better if they are copper. It is also desirable if the wire is single-core in PVC insulation - it will oxidize noticeably slower than in the case of multi-core wire.
Special socket boxes must be installed in a recess in the wall - they should not stick out, otherwise it will cause a lot of trouble when installing the socket itself. The boxes are secured using alabaster, which can be found in hardware stores.
Electrical wiring in the apartment: automation to protect it
The distribution board must contain an RCD - a residual current device. It will protect the wires from overheating in the event of a significant increase in current. Nowadays, several RCDs are installed in the switchboard - this increases the cost of installing wires, but makes the electrical wiring in the house more reliable. This solution also helps to quickly and easily eliminate possible wire faults - without turning off the electricity in the entire house, you just need to turn off the current on the faulty line. 
Wiring for electrical equipment
Each room in the apartment must be equipped with overhead lighting (these are sanitary standards), which can be accompanied by local lighting - a floor lamp, table lamp, etc.
In addition, each room should have at least one outlet; for a computer, you can either provide about five outlets on the wall or make just one, but in addition to it, buy an uninterruptible power supply with several outlets - the second method is more expensive, but it will not help lose data on your computer in the event of a sudden power outage. And in the kitchen these days there are many appliances that also require electrical power, so it is important to provide enough outlets for them. 
Switches in any room should be located close to the door, at approximately your height, but in such a way that when the door is opened, access to the switch is free. The highest quality switches and sockets are on a ceramic base with copper contacts. A cable, also made of copper, under the VVGng brand, must be connected to the contacts. This cable has special insulation that prevents it from catching fire. Its thickness is about 2.5 mm, it has three wires - phase, neutral and ground.
Geometry of wiring in an apartment
Electrical wiring, as already mentioned, must be laid only along horizontal and vertical lines; there cannot be any diagonals. Despite this strict rule, wires are often laid along the shortest route, to save money or due to ignorance of even basic electrical installation rules.

Wiring geometry

This rule was not invented by chance. There are often situations when, after changing the layout of a room or carrying out repairs, you need to drill a hole, and the drill hits exactly the place where the wire is laid. Firstly, if the wires were not protected with a special protective sleeve during installation, you will have to remove all the plaster in the damaged area, repair the wire and return everything to its place, and this will take a lot of time, effort and money. Secondly, the high voltage of the wire can damage the tool and drill, and you can get an electric shock.
However, even if you ran the wires along the wall to the outlet not diagonally, but along a broken line, the same situation may arise. The only correct option for placing the wire on the wall is strictly vertical, the wire must end with a socket - in no case should you leave at least one branch of wires without an energy consumer - otherwise a short circuit will occur and a fire may start.
Vertically laid wires must be removed from door and window openings at a distance of at least 100 mm. Near heating pipes, the installation must be carried out at a distance of at least 150-200 mm; in case of perpendicular intersection, the electrical wiring must be protected with asbestos gaskets. Parallel installation near pipelines with flammable substances (gas) is carried out at a distance of at least 400 mm.
The wire must be removed from the base of the ceiling by at least 150mm - otherwise, if you make suspended ceilings, the wire may be inaccessible. Even if you do not plan to make a stretch or suspended ceiling now, it may be necessary later, and then you will have to redo everything, which will lead to additional time and effort.
How to install electrical wiring in a panel house correctly
Most often, in panel houses, electrical wiring to sockets is laid in special technical channels not vertically, but with a slope, on average at an angle of 45 0. But not always - sometimes the wires are laid vertically. This creates additional inconvenience when changing the position of the socket or switch - if you need to move them to another place, you need to make a small recess in the panel to recess the wiring, and run it vertically down or up from the old location of the switch or socket. 

That is why, when buying an apartment in a panel house, it would be best to ask the seller for a diagram of the wires on the walls. If you at least roughly know how the cables run, the risk of bumping into them when drilling a wall will be reduced to zero.
How to lay electrical wiring in the floor and ceiling
In the event that you are making a suspended or suspended ceiling, wiring on the ceiling can be done in the shortest possible way, because you do not have to drill the ceiling. The cable can be anything, but it is best to use NYM - it is triple insulated and does not need additional protection - it does not support combustion. If you use VVG or VVGng cables, then they need PVC protection. Any type of wiring is attached to the main ceiling using dowel clamps.
Under the floor, wires can also be laid in any way, in special protective pipes or in PVC corrugation.
Distribution boxes should not be located either on the ceiling or under the floor - each cable must go from the electrical panel directly to the energy consumer. This requirement is due to the fact that if such a box is damaged, you will have to remove the entire floor or remove the suspended ceiling - there is simply no other way to get to it and repair it.
Safety during electrical installation work
When laying the cable, safety precautions must be observed. Firstly, under no circumstances should you engage in laying wires if they are live - with any careless movement, a person can receive an electric shock, which can even lead to death. Therefore, before carrying out work, it is simply necessary to de-energize the wires; it would be best to disconnect them from the distribution board. And you can connect the wires to the power supply only after all the work has been completed and each end of each cable is connected to an energy consumer. Secondly, the cables must be insulated - otherwise, if droplets of water remain on the wires, a short circuit may occur when they are connected to a power source. 
All these actions can be performed by yourself, but, as we have already said, it will be better if they are carried out by qualified electricians who know all the rules for laying cables, as well as safety precautions.
Video: Electrical wiring - installation in an apartment
A modern apartment cannot be imagined without good wiring. But even where it has already been carried out, it needs to be changed from time to time. Do-it-yourself electrical wiring in an apartment is difficult, but it is possible. And we will tell you how to carry out all the work.
We design electrical wiring in the apartment
Do-it-yourself wiring in an apartment begins with drawing up a plan, as in any other construction field. Only after this can you proceed to practical work on installing cables, sockets, and switches. When drawing up a plan, you need to draw a drawing of the house (carry out design), making sure to indicate the connection points for sockets and switches, and household appliances. To carry out this work as efficiently as possible, divide the stages into groups (for example, connecting sockets and lighting lamps is carried out separately).
Pay special attention to the bathroom, since this room is characterized by a high level of humidity, which means that the wiring requirements are more stringent. So, if it is advisable to make an RCD (residual current device). The principle is simple - during a current leak, the entire room is de-energized. You also need to choose the right machine for your apartment - a circuit breaker.
- for sockets, it is advisable to purchase a machine with a rated current of 16 A;
- for lighting - at least 10 A.
Now we will tell you how to install electrical wiring in an apartment yourself. The main thing is that you carefully study our recommendations without deviating one step from them.
How to conduct wiring in an apartment - installation methods
Wiring can be installed using two methods – closed and open wiring. Each option needs to be considered in more detail to understand the differences between them.
- Open wiring. Passes through pipes and baseboards. The height of the gasket in this case is not standardized. During installation, lighting and power wires must not be laid together. In this case, it is best to purchase safe skirting boards made of fireproof material.
- . This type of electrical wiring is carried out inside walls and partitions, in suspended ceilings. In this case, it is preferable to use cables that must be durable, protected from damage, moisture and fire.
Also, you should not purchase cheaper steel pipes for laying cables.
Installing wiring in an apartment - what do you need to remember?
Before connecting the electrical wiring in the apartment, you need to take several important preparatory steps. So, we have already talked about designing and drawing the circuit - a very important step on which the quality of installation depends. The next step is to make markings in the wiring diagram, along which the wires will be laid and a temporary shield will be installed.
It is advisable to start work by laying the main bundle of cables, their branches and indicating their turns. Do not forget that the cables must be arranged vertically or horizontally. After finishing, draw a diagram that you will need when carrying out the main work. After this, we need to purchase tools and other construction equipment (we select them based on the material of the walls and other surfaces):
- grinder for working with concrete and brick surfaces;
- assembly chisel – suitable for working with foam blocks and plaster.
This tool will be needed to create recesses in walls and other surfaces when laying wires. Next we proceed to preparing the electrical wiring - cutting the cables. When cutting them to the required length, do not forget to leave about 15 cm of cable in reserve for connecting the cables to each other. Next, you need to prepare a sealing mixture, which in its characteristics will be similar to that applied to the walls for finishing. It is needed to secure the wires in the groove and level the surface. Having prepared the solution, apply it to the walls and wait until the mixture dries a little, after which we smooth out the unevenness using a foam float.
Step-by-step installation of wiring in the apartment
Having completed the design, we begin to install electrical wiring in the apartment. But first of all, it is necessary to provide power to the working tool. To do this, we attach a socket and a 16 A circuit breaker to a piece of plastic, not forgetting to purchase a long extension cord that will be enough for your entire apartment.
The next step is to de-energize the house by turning off the apartment circuit breaker, remove the wires coming out from the meter and connect the temporary shed. After powering the house, you can begin work.
Important: to install electrical wiring in an apartment, it is advisable to use the help of a specialist electrician, or you need to act extremely carefully.
How to install wiring in an apartment - step-by-step diagram
Step 1: Grooving and installing socket boxes
The grooves for laying cables, as we have already said, must be either vertical or horizontal. Crooked grooves lead to accidents and injuries. To carry out the work, it is advisable to use a stepladder with a stop, which will protect you from falling and injury. We first mark the boundaries of the groove with a grinder, and then knock out the groove with a chisel, and also do not forget to knock out the places for installing the socket boxes. It is worth noting that this stage is characterized by too much noise, so it is better to talk to your neighbors in advance so that they do not complain about you. It is also worth remembering that any such work is carried out only on weekdays during working hours.
Step 2: Routing Cables
To lay the cables, first we measure the required lengths of pieces of wires and corrugation - we tighten the cable into the corrugation on a flat surface. After that, we put them in grooves and insert the ends of the cable into the socket box. After completing this step, be sure to coat the socket boxes with the prepared mixture or alabaster, and coat the grooves in small parts every 50 cm. To complete this stage, insert the ends of the corrugation into the input shield, lubricate with the mixture and do not forget to connect the wires to the terminal of the shield. After this, we install the VSC in its place, drill holes for fasteners and install dowels in the holes. After fixing the input panel, carefully insulate all the wires and lay them inside the switchboard.
Step 3: Finishing
The next step is finishing the surfaces. But before you start plastering the walls, you need to fill the socket boxes with paper, and cover the temporary shield with plastic film. In order not to accidentally break the seal from the meter, we also cover it to avoid problems with energy service specialists. Now you know how wiring is done in an apartment. But this is not the end of the work - you need to connect the remaining elements of the network. Let's get started!
Installation of electrical wiring in an apartment includes the installation of sockets and switches. There are several rules that, if followed, will protect your life:
- Sockets should be installed at a short distance from the floor (in case of flooding of rooms, this will protect against electric shock);
- do not install sockets near sinks, gas and electric stoves, etc. (products can be installed provided there is a distance of 50 cm between the socket and the equipment);
- try not to install sockets in the bathroom (if necessary, install it at a minimum distance of 2.5 m from the source of moisture).
Now you can start installing the products. Before purchasing them, be sure to study quality certificates and other documents that can confirm the safety of sockets and switches. Installation of sockets can be carried out using two methods - open and hidden. In the first case, you need to use electrical outlets that do not conduct current. Products are attached to surfaces with glue or self-tapping screws. If you want to make hidden wiring, you need to purchase suitable products, which are first placed in installation boxes and then mounted in prepared holes in the partitions.
Latest site materials
Equipment

What does the name Julia mean - meaning of the name, interpretation, origin, compatibility, characteristics, translation
The name Julia has three versions of origin. The first says that the name came to us from the ancient Greek language and is translated as “fluffy”, “wavy”. According to the second version, it has Latin roots meaning “July”; according to the third version, the name Julia came
Well and well

Name meaning: Leonard Name Leonard
According to Higir, Leonard literally means: strong. In early childhood, they often suffer from respiratory diseases, causing a lot of trouble for parents with their restless, irritable and stubborn character. At school they are cocky, like to argue with teachers, inattentive
Plumbing

Let's discuss what flour means in dreams
If pure white flour appeared in your dream, then this means that everything is good in your life now. This dream also speaks of spiritual harmony and tranquility. The dreamer's happy life is also indicated by a dream in which you rolled out dough. Kukur
Projects

Dream Interpretation of Love Relationships
Dream Interpretation of a SuitcaseIf anyone thinks about why a suitcase is dreamed of, the first thing that comes to mind is the road. After all, in real life, we only need it for this. Packing a suitcase means one of two things, either we are getting ready to travel, or we are moving, the third
Well and well

Dream Interpretation - Water, clean and cold
1 ABC of dream interpretation Why does a woman dream about drinking: To dream of drinking from a glass container - Danger; Drinking good drinks for a healthy person means well-being, for a sick person - illness; Drinking water from an iron utensil means falling with a bruise. 2 French dream book See
Boilers

They want to drown you. Why do you dream of drowning? Dream Interpretation Drowning
If in a dream you had to drown something or someone, then in reality you are trying to get rid of something or forget. The interpretation is directly related to the meaning of the object of drowning. The dream book will consider various options and tell you why this cruel plot is dreamed of. What x